Hãy chia sẻ với bạn bè và người thân của bạn những bức ảnh mang màu sắc phong cách hoài cổ (Vintage/Retro) đầy cảm xúc được bạn blend màu.
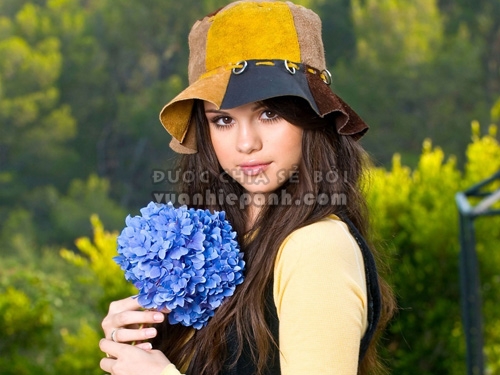
![thu-thuat, thu-thuat-photoshop, thu thuat photoshop, blend mau, blend màu Vintage Retro, Vintage, Retro, mau hoai co](/uploads/news/ky-thuat-nhiepanh/hauky-chinhsuaanh/blend-mau/blend.jpg)
Ảnh gốc
Với cách làm này bạn chỉ cần thao tác đơn giản với công cụ Solid color trong Create new fill và các chế độ hòa trộn trong Layer.
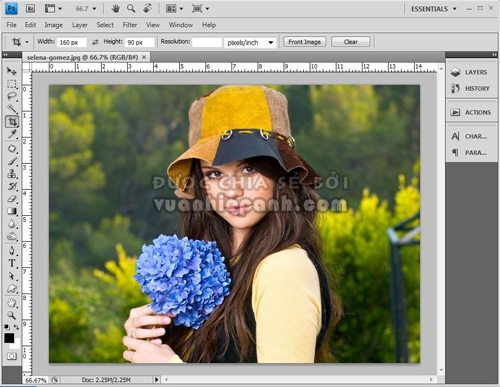
Bước 1:
Mở bức ảnh bạn cần chỉnh sửa trong Photoshop
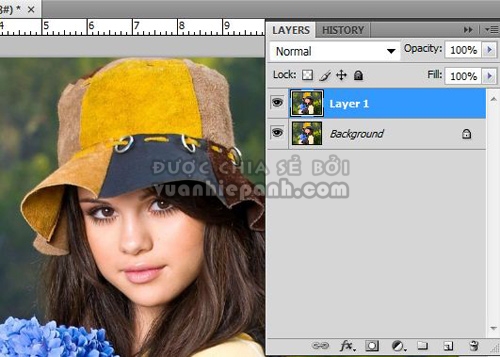
![thu-thuat, thu-thuat-photoshop, thu thuat photoshop, blend mau, blend màu Vintage Retro, Vintage, Retro, mau hoai co](/uploads/news/ky-thuat-nhiepanh/hauky-chinhsuaanh/blend-mau/blend-mau.jpg)
Bước 2:
Nhân đôi lớp Layer này với Duplicate Layer hoặc Ctrl+J
![thu-thuat, thu-thuat-photoshop, thu thuat photoshop, blend mau, blend màu Vintage Retro, Vintage, Retro, mau hoai co](/uploads/news/ky-thuat-nhiepanh/hauky-chinhsuaanh/blend-mau/blend-mau_1.jpg)
Bước 3:
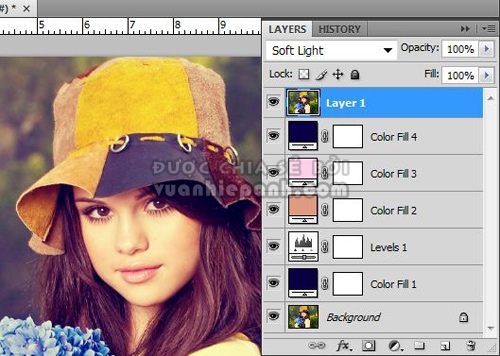
Tích vào công cụ Solid color, chọn tông màu với số # 070142
![thu-thuat, thu-thuat-photoshop, thu thuat photoshop, blend mau, blend màu Vintage Retro, Vintage, Retro, mau hoai co](/uploads/news/ky-thuat-nhiepanh/hauky-chinhsuaanh/blend-mau/blend-mau_2.jpg)
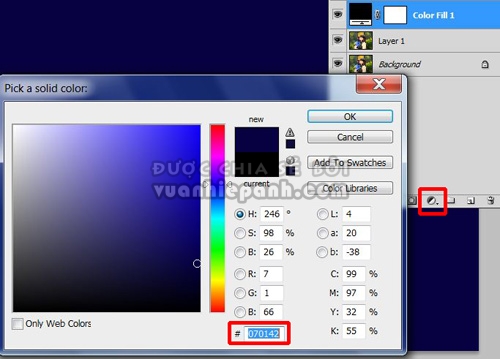
Đổi chế độ hòa trộn trong Layer là Exclusion
![thu-thuat, thu-thuat-photoshop, thu thuat photoshop, blend mau, blend màu Vintage Retro, Vintage, Retro, mau hoai co](/uploads/news/ky-thuat-nhiepanh/hauky-chinhsuaanh/blend-mau/blend-mau_3.jpg)
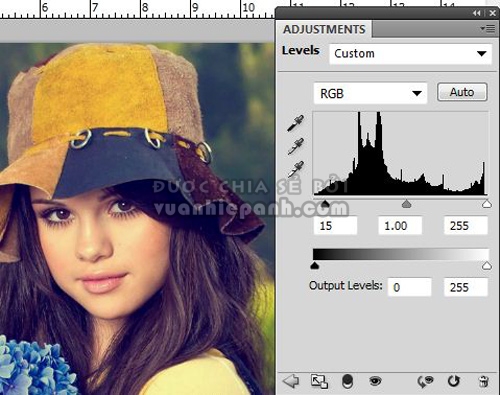
Mở công cụ Levels tăng độ tương phản cho ảnh
![thu-thuat, thu-thuat-photoshop, thu thuat photoshop, blend mau, blend màu Vintage Retro, Vintage, Retro, mau hoai co](/uploads/news/ky-thuat-nhiepanh/hauky-chinhsuaanh/blend-mau/blend-mau_4.jpg)
Bước 4:
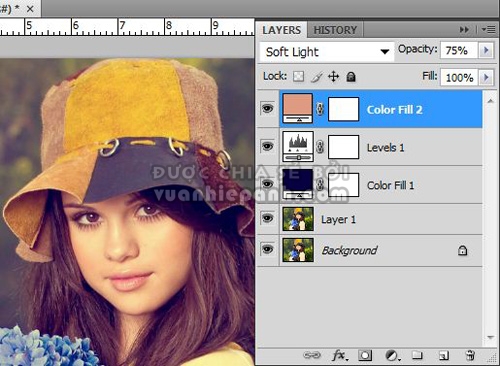
Tiếp tục sử dụng công cụ Solid color và chọn tông màu với thông số # de9b82
![thu-thuat, thu-thuat-photoshop, thu thuat photoshop, blend mau, blend màu Vintage Retro, Vintage, Retro, mau hoai co](/uploads/news/ky-thuat-nhiepanh/hauky-chinhsuaanh/blend-mau/blend-mau_5.jpg)
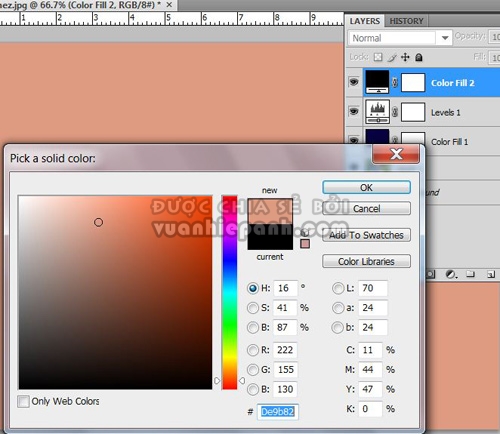
Chuyển chế độ hòa trộn thành Soft Light và giảm Opacity xuống khoảng 75%
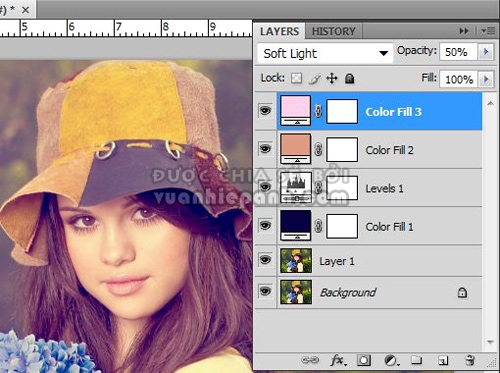
![thu-thuat, thu-thuat-photoshop, thu thuat photoshop, blend mau, blend màu Vintage Retro, Vintage, Retro, mau hoai co](/uploads/news/ky-thuat-nhiepanh/hauky-chinhsuaanh/blend-mau/blend-mau_6.jpg)
Bước 5:
Thao tác tương tự bước trên nhưng với tông màu có thông số # fed1eb
![thu-thuat, thu-thuat-photoshop, thu thuat photoshop, blend mau, blend màu Vintage Retro, Vintage, Retro, mau hoai co](/uploads/news/ky-thuat-nhiepanh/hauky-chinhsuaanh/blend-mau/blend-mau_7.jpg)
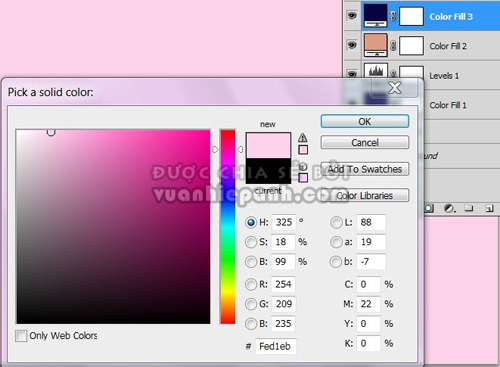
Chuyển chế độ hòa trộn thành Soft Light và giảm Opacity xuống khoảng 50%
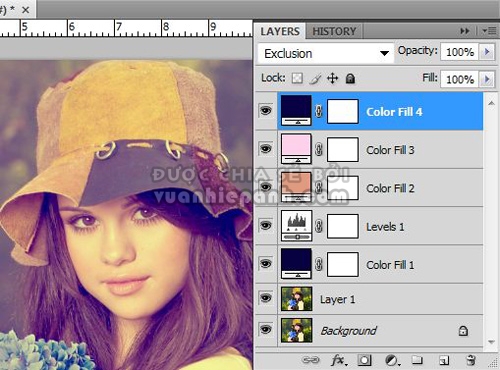
![thu-thuat, thu-thuat-photoshop, thu thuat photoshop, blend mau, blend màu Vintage Retro, Vintage, Retro, mau hoai co](/uploads/news/ky-thuat-nhiepanh/hauky-chinhsuaanh/blend-mau/blend-mau_8.jpg)
Bước 6:
Sử dụng công cụ Solid color một lần nữa với tông màu có số # 070044
![thu-thuat, thu-thuat-photoshop, thu thuat photoshop, blend mau, blend màu Vintage Retro, Vintage, Retro, mau hoai co](/uploads/news/ky-thuat-nhiepanh/hauky-chinhsuaanh/blend-mau/blend-mau_9.jpg)
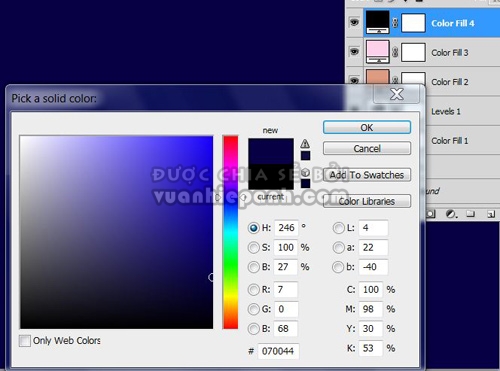
Với bước này, bạn chuyển chế độ hòa trộn thành Exclusion
![thu-thuat, thu-thuat-photoshop, thu thuat photoshop, blend mau, blend màu Vintage Retro, Vintage, Retro, mau hoai co](/uploads/news/ky-thuat-nhiepanh/hauky-chinhsuaanh/blend-mau/blend-mau_10.jpg)
Bước 7:
Kéo Layer 1 thành lớp trên cùng
![thu-thuat, thu-thuat-photoshop, thu thuat photoshop, blend mau, blend màu Vintage Retro, Vintage, Retro, mau hoai co](/uploads/news/ky-thuat-nhiepanh/hauky-chinhsuaanh/blend-mau/blend-mau_11.jpg)
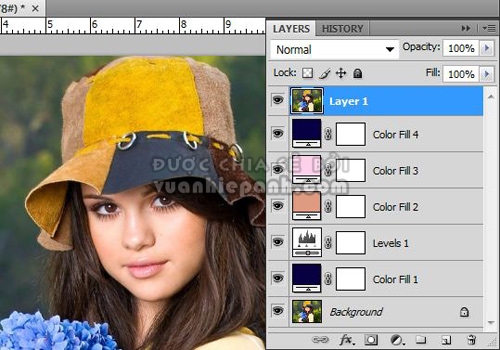
Sau đó thay đổi chế độ hòa trộn thành Soft Light
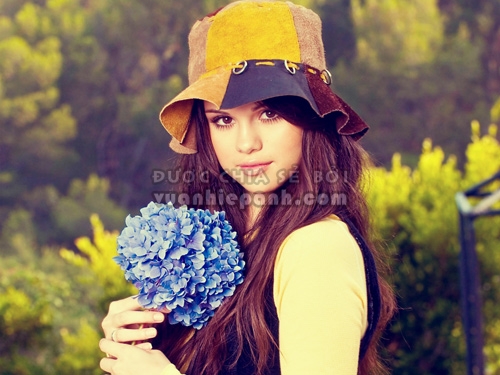
![thu-thuat, thu-thuat-photoshop, thu thuat photoshop, blend mau, blend màu Vintage Retro, Vintage, Retro, mau hoai co](/uploads/news/ky-thuat-nhiepanh/hauky-chinhsuaanh/blend-mau/blend-mau_12.jpg)
Kết quả
![thu-thuat, thu-thuat-photoshop, thu thuat photoshop, blend mau, blend màu Vintage Retro, Vintage, Retro, mau hoai co](/uploads/news/ky-thuat-nhiepanh/hauky-chinhsuaanh/blend-mau/blend-mau_13.jpg)
Phần này sẽ hướng dẫn bạn blend màu Vintage/Retro với công cụ Curves quen thuộc.
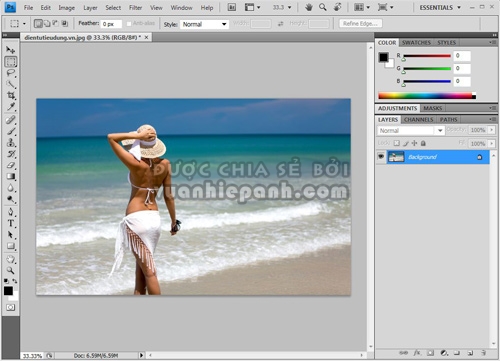
![Photoshop, thu-thuat, thu-thuat-photoshop, thu thuat photoshop, blend mau, blend màu Vintage Retro, Vintage, Retro, mau hoai co](/uploads/news/ky-thuat-nhiepanh/hauky-chinhsuaanh/blend-mau/blend-mau_14.jpg)
Ảnh gốc
Bước 1:
Mở bức ảnh cần chỉnh sửa trong
Photoshop
![Photoshop, thu-thuat, thu-thuat-photoshop, thu thuat photoshop, blend mau, blend màu Vintage Retro, Vintage, Retro, mau hoai co](/uploads/news/ky-thuat-nhiepanh/hauky-chinhsuaanh/blend-mau/blend-mau_15.jpg)
Bước 2:
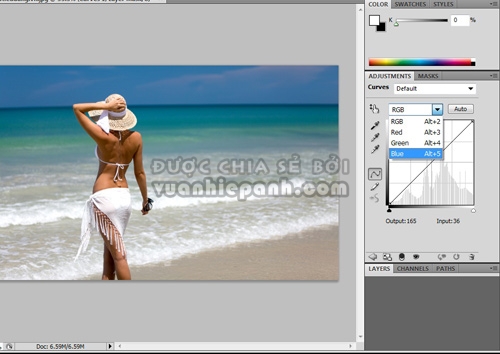
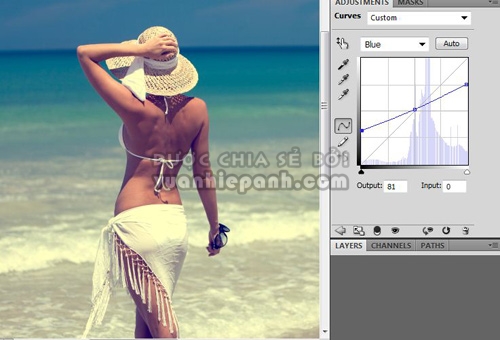
Mở công cụ Curves trong Adjustment Layer. Trên thanh RGB, tích chuột phải sẽ hiển thị thêm các thanh màuReb, Green, Blue.
![Photoshop, thu-thuat, thu-thuat-photoshop, thu thuat photoshop, blend mau, blend màu Vintage Retro, Vintage, Retro, mau hoai co](/uploads/news/ky-thuat-nhiepanh/hauky-chinhsuaanh/blend-mau/blend-mau_16.jpg)
Bước 3:
Chọn thao tác trên thành màu Blue, bạn có thể di thanh công cụ để tạo màu như hình.
![Photoshop, thu-thuat, thu-thuat-photoshop, thu thuat photoshop, blend mau, blend màu Vintage Retro, Vintage, Retro, mau hoai co](/uploads/news/ky-thuat-nhiepanh/hauky-chinhsuaanh/blend-mau/blend-mau_17.jpg)
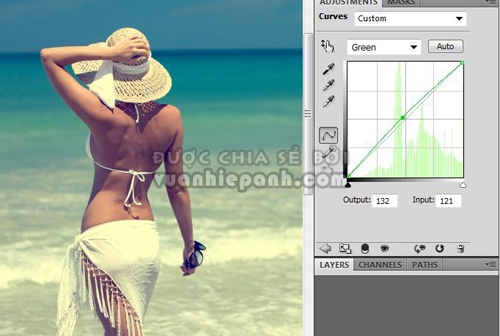
Làm tương tự với thanh màu Green, nhưng chỉ kéo thanh công cụ nhích cao hơn một chút vì hình ảnh đã ám rất nhiều màu xanh.
![Photoshop, thu-thuat, thu-thuat-photoshop, thu thuat photoshop, blend mau, blend màu Vintage Retro, Vintage, Retro, mau hoai co](/uploads/news/ky-thuat-nhiepanh/hauky-chinhsuaanh/blend-mau/blend-mau_18.jpg)
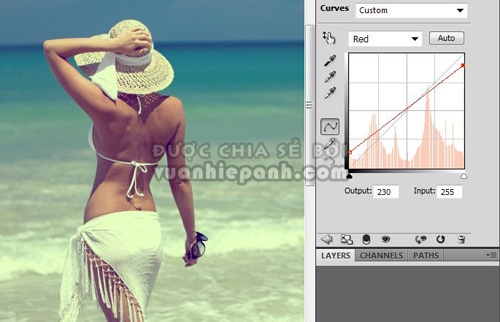
Thao tác tương tự với thanh màu Reb
![Photoshop, thu-thuat, thu-thuat-photoshop, thu thuat photoshop, blend mau, blend màu Vintage Retro, Vintage, Retro, mau hoai co](/uploads/news/ky-thuat-nhiepanh/hauky-chinhsuaanh/blend-mau/blend-mau_19.jpg)
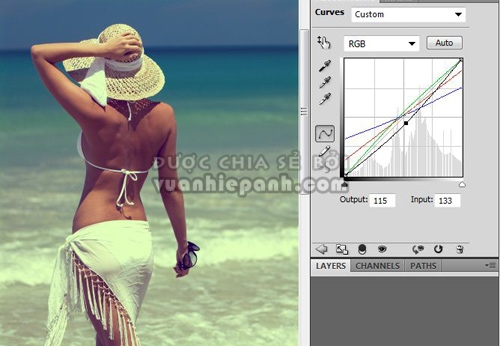
Sau đó, chọn về thanh RGB chỉnh tổng thể màu. Kéo thanh công cụ sao cho hình ảnh đậm màu hơn
![Photoshop, thu-thuat, thu-thuat-photoshop, thu thuat photoshop, blend mau, blend màu Vintage Retro, Vintage, Retro, mau hoai co](/uploads/news/ky-thuat-nhiepanh/hauky-chinhsuaanh/blend-mau/blend-mau_20.jpg)
Bước 4:
Chọn công cụ Levels để căng chỉnh độ tương phản và độ sáng của hình ảnh.
![Photoshop, thu-thuat, thu-thuat-photoshop, thu thuat photoshop, blend mau, blend màu Vintage Retro, Vintage, Retro, mau hoai co](/uploads/news/ky-thuat-nhiepanh/hauky-chinhsuaanh/blend-mau/blend-mau_21.jpg)
Bước 5:
Chọn thao tác trên Layer Background, sau đó vào Filter>Distort> Lens Correction để tạo hiện tượng tối viền 4 góc ảnh.
![Photoshop, thu-thuat, thu-thuat-photoshop, thu thuat photoshop, blend mau, blend màu Vintage Retro, Vintage, Retro, mau hoai co](/uploads/news/ky-thuat-nhiepanh/hauky-chinhsuaanh/blend-mau/blend-mau_22.jpg)
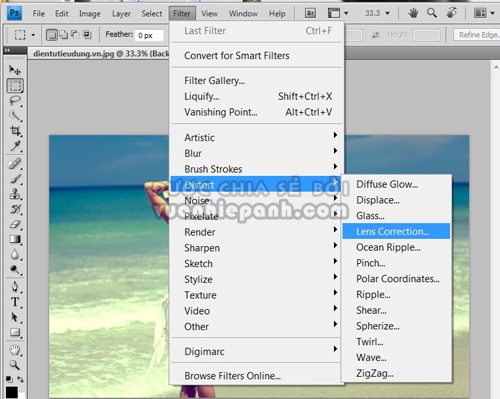
Sử dụng các công cụ mục Vignette và điều chỉnh mức độ sáng tối, sao cho bức ảnh của bạn có 4 vùng góc ảnh hợp lý.
![Photoshop, thu-thuat, thu-thuat-photoshop, thu thuat photoshop, blend mau, blend màu Vintage Retro, Vintage, Retro, mau hoai co](/uploads/news/ky-thuat-nhiepanh/hauky-chinhsuaanh/blend-mau/blend-mau_23.jpg)
Kết quả
![Photoshop, thu-thuat, thu-thuat-photoshop, thu thuat photoshop, blend mau, blend màu Vintage Retro, Vintage, Retro, mau hoai co](/uploads/news/ky-thuat-nhiepanh/hauky-chinhsuaanh/blend-mau/blend-mau_24.jpg)
Chúc các bạn thành công và có những bức ảnh đẹp!
Ý kiến bạn đọc